|
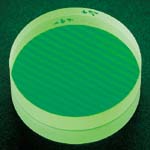
Surface Flatness is the deviation for a plano surface such as a window or mirror. When a test plate (typically an optical flat, as shown below) is held in contact with the work piece (the part under inspection), a contour map is visible as light and dark bands. These dark bands are called Newton's rings or fringes. Due to the air gap between the surfaces, each ring corresponds to the vertical distance between the test plate and the surface under inspection. Since the test plate in this case is a clear, flat reference, the air gap is very small so the surface flatness is defined in terms of wavelength (very small unit of measure); i.e. 1/4 wave or l/4. The spacing between rings is equal to one-half the wavelength of the illumination source; i.e. 1/4 wave = 1/2 ring. A monochromatic green light at the 546.1 nm mercury line or helium-neon red laser line at 632.8 nm is used for illumination. Typically, only values less than 1/4 wave are considered to be precision and values less than l/10 to be high precision.
|
 |